The Lazy Developer Series: E2 — Automating workflows using a CLI
- Published on
Intro
Great developers are often lazy. The idea behind a productively lazy developer is one of efficiency. Lazy developers tend to focus only on tasks that are important, rather than robotically navigating through a SCRUM list. They'll automate anything that can be automated.
This means that a lazy developer can optimise not only their own workflows, but also the workflow of others, effectively increasing the efficiency of the entire team. A lazy developer has the skills to identify areas that would benefit from automation, and streamline their workflow to only include the important tasks.
And the best part of this is that once the easiest method has been identified, other members of the team are able to use it as well. Laziness, despite all its negative connotations, can be quite the productivity boon.
So what are we doing in this episode? I'm glad you asked. In this episode of The Lazy Developer series, we will build a CLI tool to automate a workflow. More specifically, I'll show how I automated creation of new blog post template using a CLI built using JavaScript. Let's get started!
What's a CLI?
CLI stands for Command Line Interface. Simply put, these are commands which you can run in the terminal, and it does a bunch of stuff. ls, mkdir, cd are some commands which you must be familiar with.
It was commonly used in the 1960s -1980s when GUIs weren't a thing, and users would interact with the operating system mostly using a keyboard. Today, most users no longer use command-line interfaces due to the development of GUI. However, CLI is still used among developers and software engineers when installing software, configuring operating systems, and accessing features that aren't otherwise available with GUI.
There are more complex CLI tools as well. For example, Angular has a great CLI tool. You can use it to initialize a new project, create a component, create a production build, upgrade version of Angular and much more.
npm install -g @angular/cli
ng new my-app
ng serve
ng build my-app -c production
There are CLI tools from companies like Github, AWS Command Line Interface, Azure CLI, Terraform CLI and many more.
Advantages of using a CLI
- CLI do not have a User Interface outside the terminal application it is being used in. This has an advantage that it does not require memory and processing power of the latest computer and will often run on lower spec machines.
- If you know the commands, a CLI can be a lot faster and efficient than any other type of interface. It can also handle repetitive tasks easily.
- Tasks can be automated using a script file. For example, a batch file could launch half a dozen programs to do its task.
Disadvantages of CLI
- If you are new to software development or have never used a CLI before, using a CLI can be daunting task. There are also a lot of commands that need to be learned.
- Command accuracy is of the utmost importance. If there is a typo, the command will fail. If a command is mistyped, one might end up bringing down production systems1.
Bottom Line: To automate common tasks, managing files on a web server, work with remote servers, or need ways to manage files more easily and rapidly, you'll want to consider investing in learning how to use a CLI.
Building a CLI
The most common feature between all the CLIs I've used are:
- Ability to take various types of user input, like text, list items, file, boolean
(y/n)etc. - Support for optional flags, like
npm init -ywhere-yis a flag which tellsnpmto skip user input and use the default values forpackage.jsonfile. - Handy user manual or documentation within the Terminal app, usually with a
-hflag. - Cross-Platform support, because building for a single platform is a poor experience. 🙅🏽♂️
We'll use an open-source framework called Inquirer.js by Simon Boudrias. Inquirer.js provides a user interface for prompting user input. We can add a list of questions, specify the type and default values. Advanced features like conditionally chaining the prompts, adding validation to the inputs and transformation options are also available2.
Installing Inquirer.js is straightforward using npm.
npm install inquirer
Inquirer.js has a very simple API. It's promise based, so we can use .then() or even wrap it in a async/await syntax.
var inquirer = require('inquirer')
inquirer
  .prompt([
    /* Pass your questions in here */
  ])
  .then((answers) => {
    // Use user feedback for... whatever!!
  })
  .catch((error) => {
    if (error.isTtyError) {
      // Prompt couldn't be rendered in the current environment
    } else {
      // Something else went wrong
    }
  })
prompt takes either an object or an array of Question.
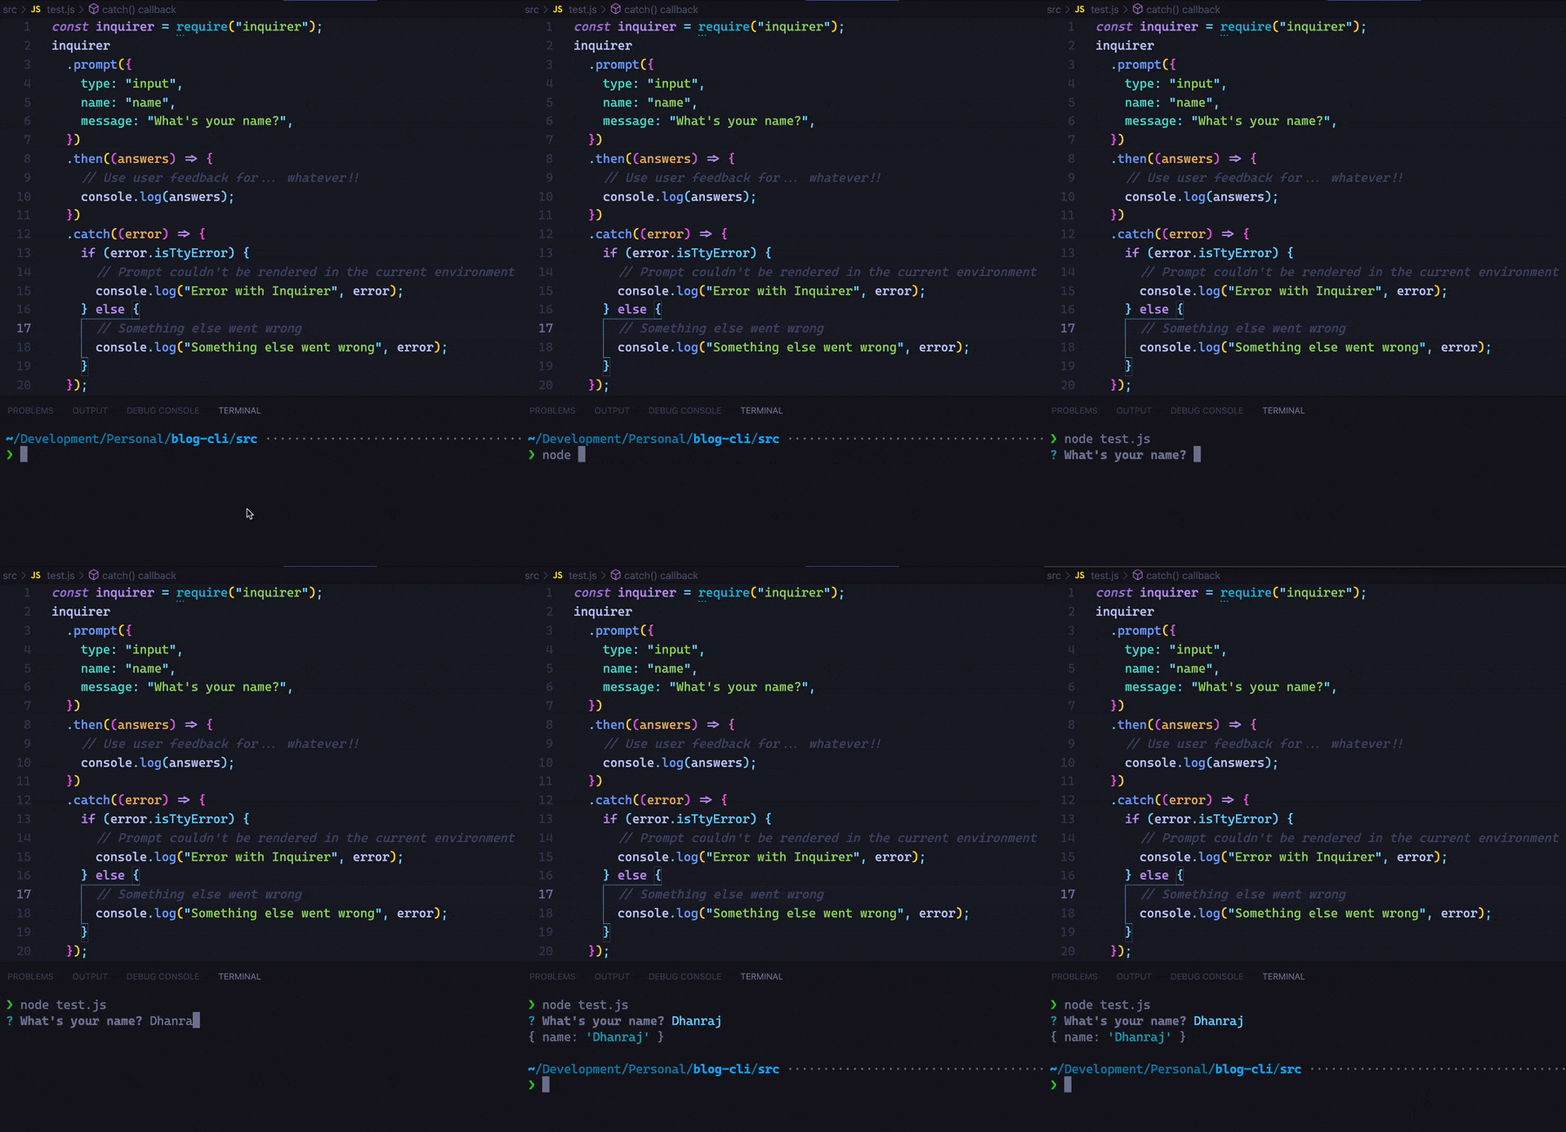
Let's see a simple example:

Now that we know how to create a basic CLI which takes user input, let's build our full-fledged CLI.
Automating Blog Templates
I use Gatsby for this site. All my Blog posts are written in Markdown. Every markdown post as a front-matter, which contains metadata about the post. Here's how the front-matter for this post looks like:
---
title: 'The Lazy Developer Series: E2 — Automating workflows using a CLI'
author: Dhanraj Padmashali
tags:
  - The Lazy Developer Series
  - NodeJS
  - cli
  - Automation
image: /static/images/gears.png
date: '2021-05-15T18:10:59.558Z'
draft: false
permalink: automating-workflows-using-a-cli
excerpt: >-
  In this episode of The Build Series, we will build a CLI to automate creation
  of new blog posts
photo_author: Isis França
photo_author_url: 'https://unsplash.com/@isisfra'
photo_service: Unsplash
photo_service_url: 'https://unsplash.com/photos/hsPFuudRg5I'
---
Whenever I want to create a new blog post, I usually copy the front-matter from a previous post and replace the values. Often times I forget to update the date, or the image attribution. And copy-pasting the same file is a boring task, so I decided to build a CLI to automate it.

Preparing the CLI
In the above example GIF, the file was executed using the command node <file-name.js>. For a CLI, we should be having a command instead of using the node ... syntax. To do that we need to make a couple of changes in the project.
- Specify the
binexecutable inpackage.json. This lets us define the command to use to run a specific file
 "bin": {
    "new-post": "./script/new-post.js",
  }
- Add a
shebangline at the top of the script file (./script/new-post.js). The#!syntax used in scripts to indicate an interpreter for execution under UNIX / Linux operating systems.3
#!/usr/bin/env node

const inquirer = require('inquirer')
- Install the application, to have the command available globally in any terminal session.
npm install -g .
Note: You need to be in the directory where the CLI package.json is. . is intentional here.
- Now we can run
./script/new-post.jsusing
new-post
Creating the Questions List
First step is to identify the fields that require user input, and the fields that can be generated programmatically. In our case, for the markdown front-matter, date and permalink can be generated programmatically. The remaining fields are filled by user (that's me).
Expand to see the code for questions.js
questions.jsconst questions = [
{
type: 'input',
name: 'blog_title',
message: 'Blog Title',
default: 'Random Blog Title',
},
{
type: 'input',
name: 'blog_tags',
message: 'Enter Tags',
default: '',
filter: function (value) {
return value.split(',')
},
},
{
type: 'list',
name: 'cover_image',
message: 'Choose Cover Image:',
choices: ['Default', 'Download Custom'],
default: 'Default',
},
{
type: 'input',
name: 'blog_permalink',
message: 'Enter Permanlink (Defaults to Title Slug)',
default: function (currentSession) {
return currentSession.blog_title.replace(/\s+/g, '-').toLowerCase()
},
},
{
type: 'input',
name: 'blog_excerpt',
message: 'Enter Excerpt:',
default: '',
},
]
const coverImageQuestions = [
{
type: 'input',
name: 'cover_image_url',
message: 'Cover Image URL',
when: function (answers) {
return answers.cover_image === 'Download Custom'
},
},
{
type: 'input',
name: 'cover_image_file',
message: 'Cover Image File Name',
default: 'cover',
when: function (answers) {
return answers.cover_image_url
},
},
{
type: 'input',
name: 'cover_image_author',
message: 'Cover Image Author',
default: 'Yancy Min',
when: function (answers) {
return answers.cover_image
},
},
{
type: 'input',
name: 'cover_image_author_url',
message: 'Cover Image Author URL',
default: 'https://unsplash.com/@yancymin',
when: function (answers) {
return answers.cover_image
},
},
{
type: 'input',
name: 'cover_image_service',
message: 'Cover Image Service',
default: 'Unsplash',
when: function (answers) {
return answers.cover_image
},
},
{
type: 'input',
name: 'cover_image_service_url',
message: 'Cover Image Service URL',
default: 'https://unsplash.com/photos/842ofHC6MaI',
when: function (answers) {
return answers.cover_image
},
},
]
const confirmationQuestions = [
{
type: 'confirm',
name: 'blog_confirm',
message: 'Continue to create Markdown File?',
default: false,
},
]
module.exports = {
questions,
coverImageQuestions,
confirmationQuestions,
}
Some questions depend on the answer of the previous question. For example, Choose Cover Image: can be either Default or Download Custom. If Download Custom is selected, then coverImageQuestions are prompted. The code to check if a question needs to be displayed to the user is specified in when:
when: function (answers) {
      return answers.cover_image === 'Download Custom';
    },
Creating Files and Folders
Creating Files and Folder is easy with the help of the fs module.4 We need to create a folder, and then create a markdown file in it to add the front-matter content.
const fs = require('fs')

function _mkdir(path, cb) {
  try {
    fs.mkdir(path, { recursive: true }, (err) => {
      if (err) throw err
      cb(this)
    })
  } catch (err) {
    console.error(err)
  }
}

function _mkfile(file) {
  fs.closeSync(fs.openSync(file, 'a'))
  return this
}
_mkdir creates a folder at the given path. _mkfile creates a file, a specifies if the file exists, do not overwrite it's content.
Updating Front Matter
For working with the front-matter content, we will use an open-source package called gray-matter by Jon Schlinkert. What does this package do? Converts a string with front-matter, like this:
---
title: Hello
slug: home
---
<h1>Hello world!</h1>
into an object like this:
{
  content: '<h1>Hello world!</h1>',
  data: {
    title: 'Hello',
    slug: 'home'
  }
}
To work with front-matter let's create a simple factory class which encapsulates the gray-matter APIs and provides a nice chainable API.
Expand to see code for front-matter.js
front-matter.jsconst matter = require('gray-matter')
const fs = require('fs')
class FrontMatterService {
constructor() {}
_printObject(obj) {
console.log(JSON.stringify(obj, null, 2))
}
_path(path) {
this.path = path
return this
}
read(path) {
this._path(path)
this.file = fs.readFileSync(this.path)
this.matter = matter(this.file)
return this
}
save(callback) {
let data = matter.stringify(this.matter.content, this.matter.data)
console.log('Frontmatter Service: Writing to file')
fs.writeFile(this.path, data, (err) => {
if (!err) callback && callback({ status: 'SUCCESS', data })
else console.error('Error Saving file', err)
})
}
print() {
let data = matter.stringify(this.matter.content, this.matter.data)
console.log(data)
return this
}
printJSON(flag) {
let output = flag ? this.matter[flag] : this.matter
this._printObject(output)
return this
}
getFrontMatter(callback) {
callback(this.matter.data)
return this
}
setFrontMatter(object, callback) {
this.matter.data = Object.assign(this.matter.data, object)
return this
}
getContent(callback) {
callback(this.matter.content)
return this
}
setContent(content, callback) {
this.matter.content = `${this.matter.content} \n${content}`
return this
}
}
module.exports = new FrontMatterService()
To use FrontMatterService, import FrontMatterService and provide a markdown file path. The FrontMatterService then reads the file and stores the front-matter and the markdown content in memory. We can update the front-matter and the markdown content, use the print() function to preview the current data on the console, and then use the save() method to write the front-matter and content to the file.
const frontMatterService = require('./front-matter')
const fileManager = require('./file-manager')

frontMatterService.read(fileManager.getFile()).setFrontMatter({
  title: global.answers.blog_title,
  author: 'Dhanraj Padmashali',
  tags: global.answers.blog_tags,
  image: '../../static/images/default.jpeg',
  date: new Date().toISOString(),
  draft: true,
  permalink: global.answers.blog_permalink,
  excerpt: global.answers.blog_excerpt,
})

frontmatterService.print() // Prints the front-matter in console.
frontmatterService.save() // Writes content to the markdown file
A really cool thing about the gray-matter package is that since it parses all the front-matter as objects, we can leverage Object.assign() API and just update front-matter for a specific field instead of overwriting the entire file.
setFrontMatter(object, callback) {
  this.matter.data = Object.assign(this.matter.data, object);
  return this;
}
Providing optional flags
Most CLI commands tend to have optional flags which modifies the user input, or changes the default implementation behaviour. In our case, we would like to provide a flag -d to generate a markdown file with default options.
First let's specify the default options:
module.exports = {
  blog_title: 'Random Blog Title',
  blog_tags: [],
  cover_image: 'Default',
  blog_excerpt: '',
  cover_image_url: 'https://public/images.unsplash.com/photo-1593642532744-d377ab507dc8',
  cover_image_file: 'cover',
  cover_image_author: 'Yancy Min',
  cover_image_author_url: 'https://unsplash.com/@yancymin',
  cover_image_service: 'Unsplash',
  cover_image_service_url: 'https://unsplash.com/photos/842ofHC6MaI',
  blog_confirm: true,
}
Next, let us check for if there are any arguments after the new-post command.
const defaultAnswers = require('./answers')

const myArgs = process.argv.slice(2)

switch (myArgs[0]) {
  case '-d':
    console.log('Using Answers from File:', defaultAnswers)
    global.answers = { ...defaultAnswers }
    startInquiry()
    break

  default:
    startInquiry()
}
If -d is supplied, fill the global.answers object with the default answers and start the prompt.
We pass the global.answers object to Inquirer.js when initializing the prompt like so:
const { questions } = require('./questions')

function startInquiry() {
  inquirer
    .prompt(questions, global.answers)
    .then((answers) => {
      // Put the latest answers in global.answers
      global.answers = { ...answers }
      preFlightChecks(answers)
    })
    .catch(handleError)
}
Inquirer.js will now skip the questions for which the answers are present in the global.answers object.
It's Alive!
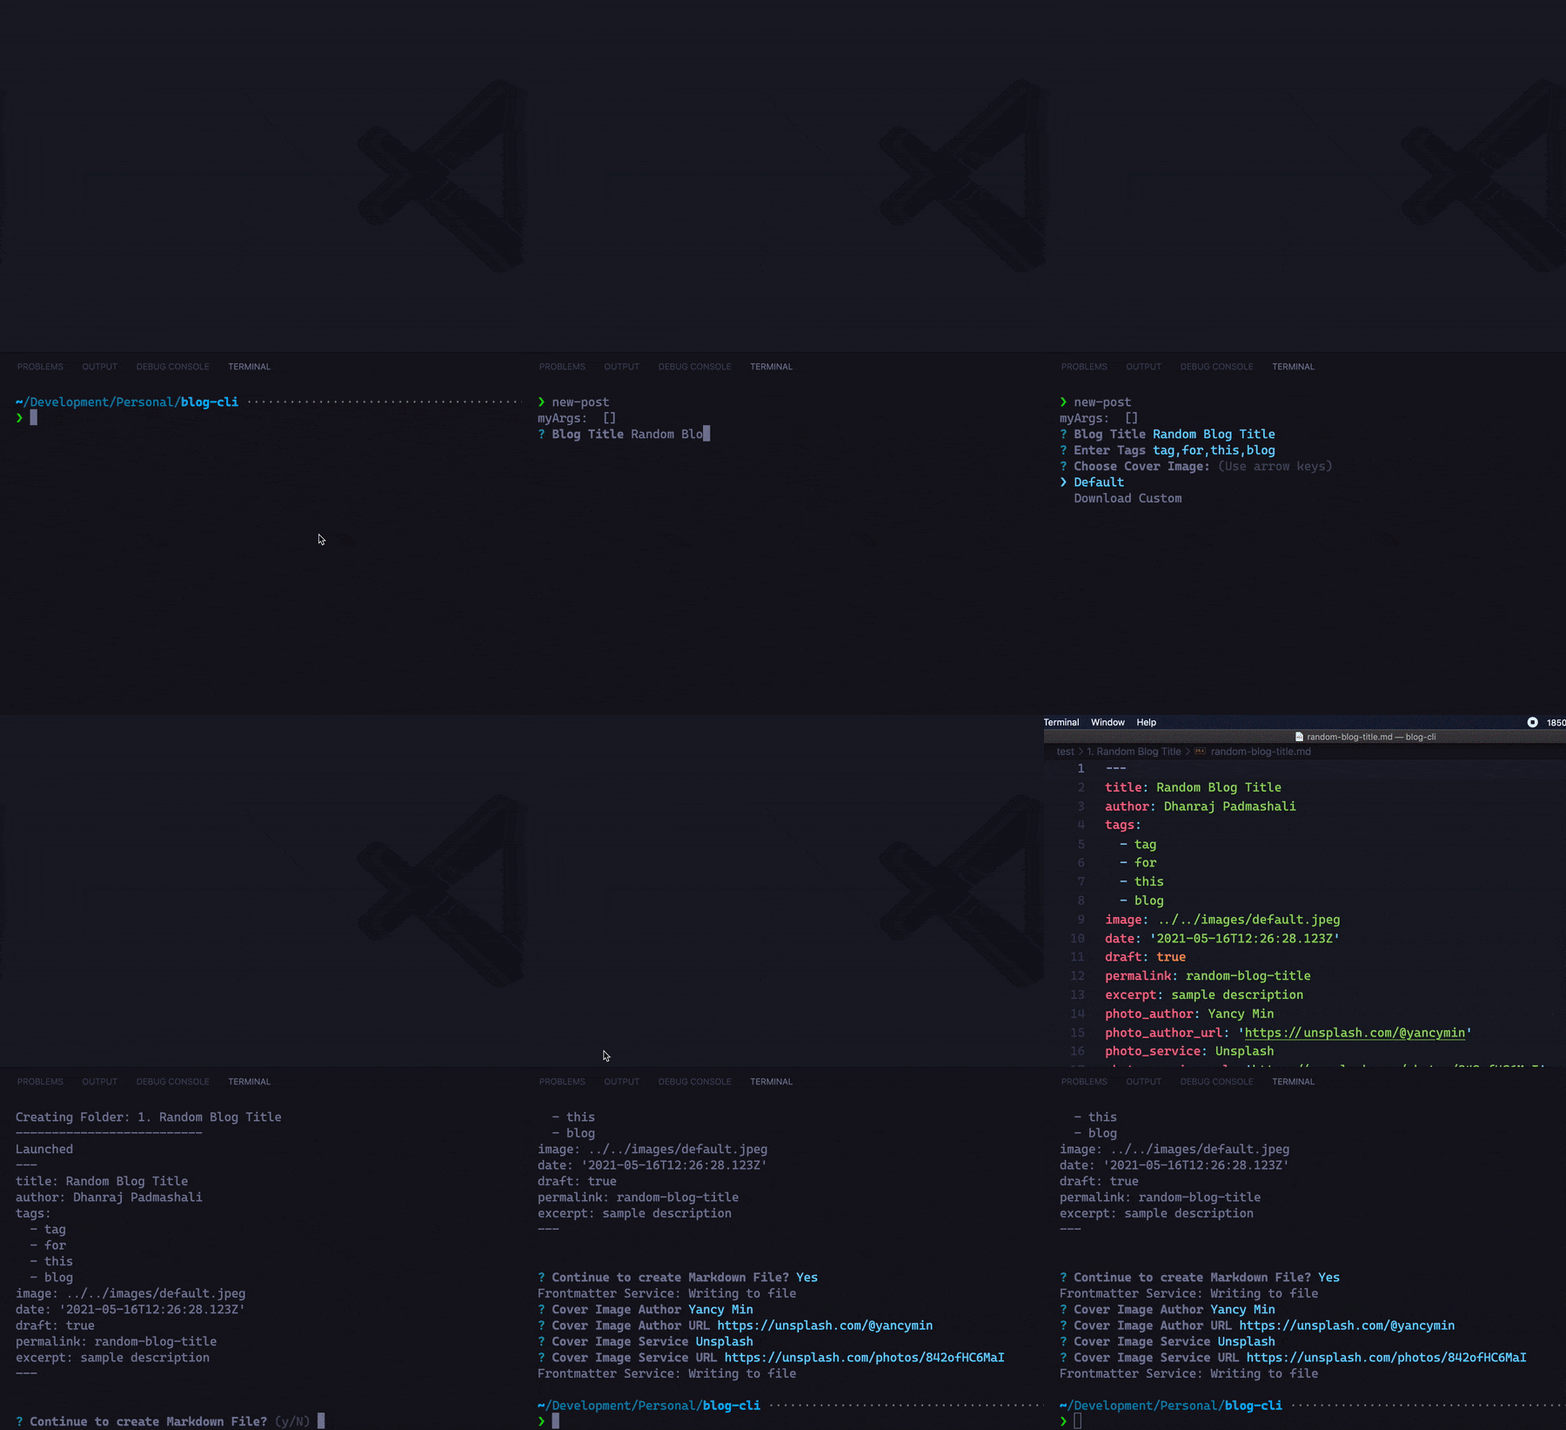
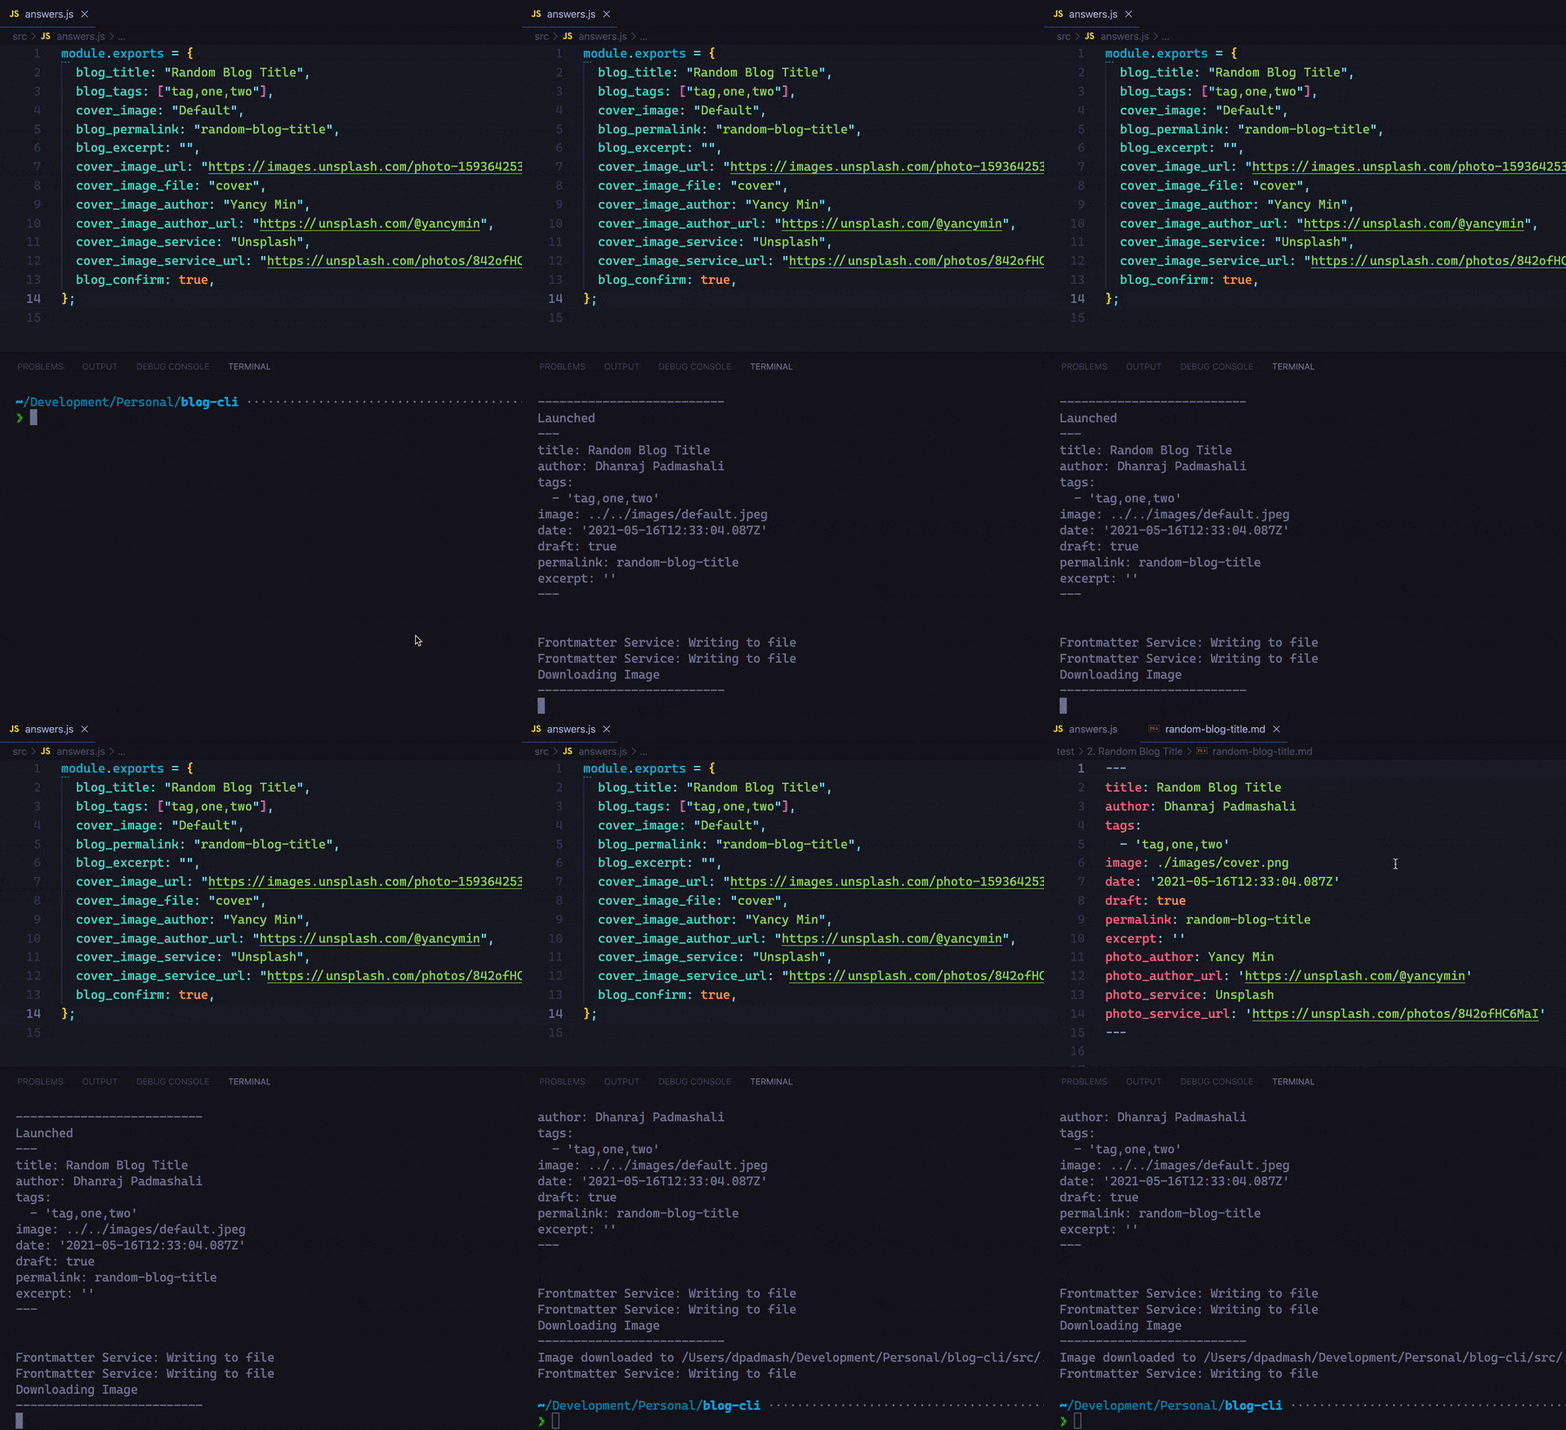
Let's see the implementation in action:
Default command implementation:

With -d flag:
-d flag:
Bonus
As part of the blog workflow, I've also created an alias that runs Gatsby in development mode, irrespective of where I am on the terminal
# Start Gatsby Blog
start-blog(){
    cd ~/Development/Personal/blog-final
    npm run develop
}
And to use this, from any terminal, just run.
start-blog
If you want to know more about alias and how you can create yours to improve productivity, checkout the first episode of The Lazy Developer series.
Conclusion
We just automated an entire workflow of creating blog posts. Granted this is a very trivial workflow, and it usually takes less than 5 mins to copy the front-matter and update it's content, it's more satisfying to do this via a CLI.

Next time you plan on automating a boring task, try Inquirer.js and build an awesome CLI. If you're searching for a full-blown command line program utility, then check out commander, vorpal or args.5
That's all for this episode of The Lazy Developer series. Feel free to comment your use case of automating tasks.
Until next time! ✌🏽
Footnotes
On this page